Creating a New Account
Overview
Overview
VersaCheck lets you manage your finances and bank accounts easily and quickly by setting up accounts within the VersaCheck program from which you can manage various transactions, including payments, deposits, transfers, etc.
New accounts may be created using a simple three-step wizard that walks you through the setup process. The Create New Account wizard may be accessed by clicking on the "Create a new account" link in the upper left-hand corner of the VersaCheck Today screen; by selecting My Accounts from the side navigation bar and clicking on the new icon; or by choosing New > New Account under the File menu.
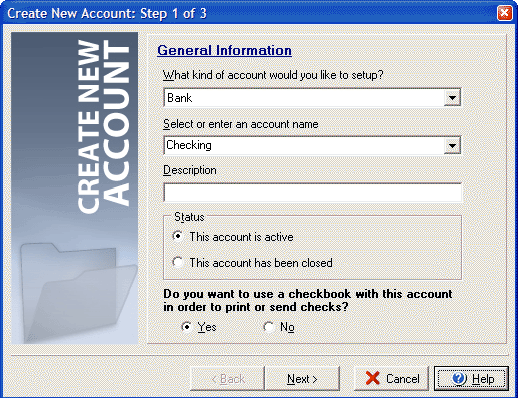
Step 1:
- Select the type of account: Bank, Cash, Credit Card, Money Market, Other Asset (i.e. a line of credit), or Other Liability (i.e. a loan balance.)
- Enter a name for your new account in the account name field.
- Enter a description for your account if you wish to do so.
- Select the Status of the account as either active or closed.
- For bank and money market accounts you may choose whether or not to use an electronic checkbook, which will allow you to write checks from the new account.
- Click Next to proceed.
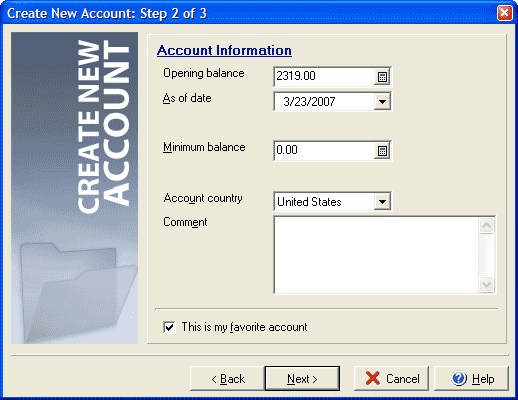
Step 2:
- Depending on the type of account you are creating the first box will ask for a current balance or balance due.
- Use the As of date field to enter the date to begin tracking the account. Depending on how you wish to use this account and your available account records, this might be the opening date of the account, the beginning of the tax or fiscal year, or the most recent date on which the account was reconciled.
- For Credit Card Accounts you should enter the total Credit Limit for the account.
- If the new account should maintain a minimum balance, you may enter that amount.
- Select the account country for where the new account is based.
- Selecting the check box for This is my favorite account will cause the account to display under the My Favorite Accounts heading in the main VersaCheck Today window.
- Click Next to proceed.
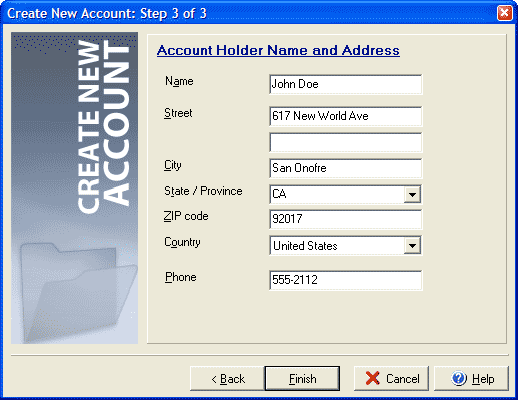
Step 3:
- Enter the Account Holder name, address and phone number into the appropriate fields.
- Click Finish.
Accounts may be edited in the same fashion by selecting My Accounts from the side navigation bar and clicking on the account to be edited and clicking the "Edit" icon.